

In the previous post, we established some (very) high-level context in place about what we need to get our code to run on a computer.
A quick recap:
- Need a working CPU that can access a working RAM
- Need instructions for the CPU in a language it understands (assembly code native to its instruction set).
We’re nowhere close to having sufficient context to see the big picture yet but we might be ready to start seeing some of the basics in action. Let’s start by running some assembly code.
Hello World!
Note: I write most of this code on my x86 Linux system. Although I've tried to omit irrelevant details / cut corners / outright lie, parts of this section can be understandably confusing. If you're having trouble visualizing any of this, stick around until we go through an example. Hopefully, that should help you visualize all of this a little better.
Just as you have your executable “.exe” files in Windows which actually runs a program on double click, Linux has a binary format called ELF (Executable and Linkable Format). The ELF format is just a binary standard on what a program “should look like”. Think of it as a recipe in a very specific format. This recipe gives Linux all the information it needs to start a process (a running program).
So it goes something like this: When you run an executable ELF file, Linux starts an “empty” process (the process has been allocated resources such as memory) and asks a program called the loader to load your ELF into this process. So your ELF has the logic and the process Linux gave you has the resources your logic can make use of. Here’s an actual footage of the process in action (or at least how I visualize it).
ELF Sections
Let’s try to understand the ELF format a little better. The ELF file is broken down into several sections. Each stores one category of data. Let’s take a look at some of the sections that are relevant to us
.text– This section contains the code for your program.data– This section contains stuff like global variables, any pre-set variables, etc..bss– This section contains stuff like unset variables.symtab– This section contains a table that maps all the symbols you’ve used. You might have used fancy variable/function names in your code but your computer doesn’t understand these symbols like you do and thus stores it in a table for easy access.
Process Memory
While we’re at it, it would also do us some good to better understand how memory is laid out for a process. To recap, Linux first creates an “empty” process for the ELF file to be loaded into. This process is also assigned memory that your code can make use of. The memory layout of a process can be visualized in a format like this (you could think of this as each process in Linux getting a special suitcase with all these compartments to store all of its data)
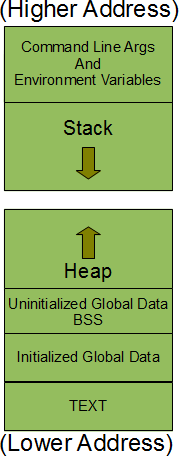
As you might have already guessed .text portion of your ELF file goes to the TEXT part of memory. The .data portion of your ELF goes to Initialized Global Data. The .bss part of your ELF goes to the Uninitialized Global Data BSS part of memory.
The majority of the memory your process has access to however, is split between Stack and Heap. Think of them as analogous to your Checking and Savings accounts. Your Checking account helps you meet your day-to-day expenditures. You use it frequently but the value of individual transactions made on your checking account is likely to be small. Our stack is like our checking account.
The heap, on the other hand, is like your Savings account. You use this less frequently compared to your Checking account but you’re probably only using it to move larger amounts of money.
Time to get our hands dirty!
We’re ready for some code now! This is what the first part of my Hello World program looks like. It defines what it wants printed, sets the stage for the print function (the second part of the code) and hands control over to it.
.data  # Begins our .data section
    msg:  # Create a symbol called "msg"
        .asciz "Hello World!\n"  # with type asciz (string) and value "Hello World!\n"

.text # Begin our .text section
.extern print # Call out there's a function named "print" that is externally defined
.globl main # Make the symbol "main" globally available

main:  # Define the symbol "main". All the lines till #18 belong to main
    push $14  # Add number 14 to the stack which is the number of characters in "msg"
    push $msg # Add the address of msg to the stack
    call print # Call the print function

    movl $1, %eax # Lines #14 to Lines #16 are to correctly exit the program
    movl $0, %ebx
int $0x80So the idea is this, we can ask an assembler to generate an ELF file for this piece of code. We define the .data section of our ELF file from Lines #1 to #3 where we define a string variable named msg with the contents “Hello World!\n”.
Lines #5 to #16 is the .text section of our ELF file that contains the actual code. There’s actually quite a bit going on here and is understandably confusing. But the important parts of this code are from Lines #10 to #12 where we set the stage by writing the inputs our print function requires (the string to print and the number of bytes in the string) to the stack part of the memory (with the push command) and call the print function.
We can generate the ELF file out of our assembly code by running the assembler. We can also read the ELF file with the objdump utility in Linux.
➜ as hello.s -o hello.o  # Generates our ELF file named hello.o

➜ file hello.o  # Use the file utility to see the type of hello.o generated
hello.o: ELF 64-bit LSB relocatable, x86-64, version 1 (SYSV), not stripped

➜ objdump -d hello.o   # Decode the .text section of our ELF file
hello.o:     file format elf64-x86-64


Disassembly of section .text:

0000000000000000 <main>:
   0:	6a 0e                	pushq  $0xe
   2:	68 00 00 00 00       	pushq  $0x0
   7:	e8 00 00 00 00       	callq  c <main+0xc>
   c:	5b                   	pop    %rbx
   d:	b8 01 00 00 00       	mov    $0x1,%eax
  12:	bb 00 00 00 00       	mov    $0x0,%ebx
  17:	cd 80                	int    $0x80

➜ objdump -s -j .data hello.o  # Decode the .data section of our ELF file
hello.o:     file format elf64-x86-64

Contents of section .data:
 0000 48656c6c 6f20576f 726c6421 0a00      Hello World!..
The decoded .text section of the ELF file does infact have the code wrote and the .data section shows the Hello World! string as expected. So far so good!
The other half of our assembly
As of now, we have an ELF file but it’s not quite ready to be run. Why? For starters, we’re missing the print function we call on Line #12. The only reason we were able to generate an ELF file out of this assembly code despite missing a function is that we promised the ELF file that the definition for a “print” function would come from an external source (from Line #6). So let’s create a similar assembly file that defines our print function (note, this function is terribly oversimplified to a point it’s almost wrong to be using it. But it should suffice for our example)
Let’s call this code print.s with the following definition
.text
.globl print

print:
    mov $1, %rax
    mov $1, %rdi
    mov 8(%rsp), %rsi
    mov 16(%rsp), %rdx
    syscall
retAll this really does is, it reads inputs from the stack and asks our operating system to print out that string. We once again generate an ELF file for this code.
At this point, we have two ELF files in our hands (one named hello.o that was generated from hello.s and the other print.o generated from print.s). We’re ready to combine the two ELF files into one that we could actually run.
Linking
The software to combine multiple ELF files into one is done by a software unsurprisingly referred to as the Linker. Each ELF file has its own sections (like the .text, .data and so on) and we need someone to combine corresponding sections into one. For example, the .text section of each ELF file needs to combined into a single one (and similarly for other sections). The linker also does this nifty thing called relocation but let’s not get into that right now.
This is how we’d go about linking our ELF files into one named runELF
➜ ld -e main hello.o print.o -o runELF    # Combine hello.o and print.o to generate runELF
➜ ./runELF  # Executing the runELF file prints out Hello World!
Hello World!While we’re at it, we should probably try to disect he generated runELF file to verify the things we’ve seen so far.
➜  file runELF  # See what type of a file runELF is
runELF: ELF 64-bit LSB executable, x86-64, version 1 (SYSV), statically linked, not stripped

➜ objdump -d runELF  # Print the .text section of runELF

runELF:     file format elf64-x86-64


Disassembly of section .text:

0000000000401000 <main>:
  401000:	6a 0e                	pushq  $0xe
  401002:	68 00 20 40 00       	pushq  $0x402000
  401007:	e8 0d 00 00 00       	callq  401019 <print>
  40100c:	5b                   	pop    %rbx
  40100d:	b8 01 00 00 00       	mov    $0x1,%eax
  401012:	bb 00 00 00 00       	mov    $0x0,%ebx
  401017:	cd 80                	int    $0x80

0000000000401019 <print>:
  401019:	48 c7 c0 01 00 00 00 	mov    $0x1,%rax
  401020:	48 c7 c7 01 00 00 00 	mov    $0x1,%rdi
  401027:	48 8b 74 24 08       	mov    0x8(%rsp),%rsi
  40102c:	48 8b 54 24 10       	mov    0x10(%rsp),%rdx
  401031:	0f 05                	syscall
  401033:	c3                   	retq

➜  objdump -s -j .data runELF

runELF:     file format elf64-x86-64

Contents of section .data:
402000 48656c6c 6f20576f 726c6421 0a00 Hello World!.. Relocation
Unsurprisingly, the .text section in runELF is a combination of the .text section of hello.o and print.o. So, all the instructions in the .text of hello.o should be contained in the .text section of runELF (which is what we do see here). However, they’re not exactly identical. Let’s pick a line from hello.o and pick the matching line from runELF and compare them.
 d:	b8 01 00 00 00       	mov    $0x1,%eax        # Line 17 in the .text of hello.o
   vs
 40100d:	b8 01 00 00 00       	mov    $0x1,%eax  # Line 16 in .text of runELF
As you can see, the instructions are identical mov $0x1,%eax vs mov $0x1,%eax (b8 01 00 00 00 is just a hexadecimal representation of mov $0x1,%eax). The difference however is the characters that come before the colon. In .text section of hello.o, this character is “d” whereas in runELF, it’s “40100d”. These characters are hexadecimal numbers and they reference the location in memory where this instruction can be found when running the ELF. This is what we mean by “relocation”. The linker has essentially combined the two ELF files and assigned each piece of data a location in memory.
Relocation isn’t expected to be making much sense at the moment. Perhaps seeing an example of this ELF file loaded into memory and in a running might help.
Wrapping Up
At this point in time, I’m fighting the urge to keep going on with some analysis of the actual execution of the code. But this seems like a logical place to stop.
A quick recap of what we’ve seen first. We’ve so far dissected ELF files without things getting too ugly (I hope?). At the same time, we’ve also taken a VERY quick look at the memory layout of a process. I don’t expect this part to make sense yet as we haven’t really gone through an example.
In the next post, let’s walkthrough the execution of runELF step by step.